Root လုပ္တာဆိုတာ ဘာလဲ …? ဘာေၾကာင္႔ Android ကို root လုပ္ရတာလဲ…..?
ဒီအေၾကာင္းအရာေတြက Android ေပၚမွာ root လုပ္လိုက္လုိ႔ ရတာတဲ႔ အစုလိုက္ထဲက အက်ိဳးအၿမတ္တစ္ခုကို ရွာေဖြ ရွင္းၿပေပးမွာပါ။
ၿပီးေတာ႔ Android Phone တစ္လုံးကို root လုပ္လိုက္လို႔ ဘယ္ဟာေတြက အေရးၾကီးပိုင္းမွာ
အသုံး၀င္တာေတြ၊ တိုးတက္ၿပန္႔ပြားလာတဲ႔ အေၿခခံ user ေတြအတြက္ root လုပ္လိုက္လို႔
အေၿခခံသဘာ သဘာ၀ေတြ၊ တခ်ိဳ႔ ရိုးရွင္းတဲ႔ applications ေတြကိုလဲ အသုံးၿပဳဖို႔ ၊
ၿပီးေတာ႔ android phones ေတြကို root လုပ္ၿပီး appllications ေတြကို
အလြန္အမင္း လုပ္တာေတြ အတြက္ ကြ်န္ေတာ္က ထည္႔သြင္း စဥ္းစားဆုံးၿဖတ္ေပးထားပါတယ္။
ကဲ..ဆက္လက္ၿပီး ခရီးဆက္ရေအာင္
Android မွာ root လုပ္တာဆိုတာ ဘာလဲ …… ?
ပထမဆုံးအေနနဲ႔ Android မွာ root လုပ္တာဆိုတာဘာလဲ တာကို အလြယ္တကူရွင္းၿပထားပါတယ္။
root ဆိုတဲ႔စကားလုံးက linux သုံးတဲ႔ User ေတြကေန ထြက္ေပၚလာတဲ႔ စကားလုံးပါ။
Android OS က linux အသုံးၿပဳေ၇းသားထားတဲ႔ system တစ္ခုပါ။
” Root ” ရဲ႔သေဘာတရားက သင္႔ရဲ႔ device ကို “Superuser” ရရွိေအာင္လုပ္တာဆိုလဲ မွန္ပါတယ္။
သင္႔ရဲ႔ Android Software မွာ permissions ရေအာင္ၿပဳလုပ္တာပါ။
root လုပ္ၿပီးတာတဲ႔ user အတြက္ အထူး ၿမွင္႔တင္ထားတဲ႔ အခြင္႔အေရးနဲ႔အတူ ၊ စြမ္းရည္ၿမင္႔တင္ထားတဲ႔
custom software (ROM) ၊custom themes , Performance ၊ battery life ေတြရဲ႔
အရည္အေသြးၿမွင္႔တင္ထားတဲ႔အရသာကိုခံစားရမွာပါ။
အေၿခံအားၿဖင္႔ သင္႔ရဲ႔ Android device ကို ” Hacking ” ၿပဳလုပ္တာပါ။
root လုပ္ၿပီးတာနဲ႔ မိမိဖုန္းကို administrator အေနနဲ႔ system တခုလုံးကို အၿပည္႔အ၀
အသုံးၿပဳႏူိင္သလို လိုအပ္သလိုလဲၿပဳၿပဳႏိူင္ပါတယ္။
ဥပမာအေနနဲ႔ ႏိူင္းယွဥ္ၿပရရင္ apple iPhone ရဲ႔ iOS ကို jailbreak လုပ္တဲ႔ အလားအလာ ပုံစံနဲ႔အတူတူပါပဲ။
Root လုပ္လိုက္တဲ႔အတြက္ သင္႔ ၀ယ္သုံးတဲ႔ Android device ရဲ႔ manufacturers or mobile operators
ေတြက တစ္စုံတစ္ခုအတြက္ အားေပးအားေၿမွာက္ၿပီး သေဘာတူညီမူမေပးပါဘူး။
ၿပီးေတာ႔ Root လုပ္ၿပီးအသုံးၿပဳတဲ႔အတြက္ သူတို႔က သင္႔ကို တားဆီးပိတ္ပင္တာတာေတြ မလုပ္ႏူိင္ပါဘူး။
ဒါေၾကာင္႔ သင္႔ရဲ႔ Android Phone ရဲ႔ တခ်ိဳ႔ service ေတြကိုအသုံးခ်ဖို႔ သင္႔ root လုပ္ခ်င္တဲ႔ စိတ္ဆႏၵရွိရင္ သင္႔ၿပဳလုပ္ႏိူင္ပါတယ္။
အခုလို root user အေနအထားအထားရဖို႔ သင္႔ရဲ႔ ဖုန္းကို root ၿပဳလုပ္ရတဲ႔ အစီအစဥ္ကို
Android rooting လုပ္ၿပဳလုပ္တာလို႔ေခၚပါတယ္။
သင္႔ရဲ႔ဖုန္းကို Root မလုပ္ခင္ သတိထားရမဲ႔အခ်က္
သင္႔ရဲ႔ဖုန္းကို root မလုပ္ခင္မွာ ေအာက္မွာေဖာ္ၿပထားတဲ႔ အခ်က္ေလးေတြဖတ္ထားဖို႔လိုပါတယ္
၁. သင္႔ရဲ႔ဖုန္းက Warranty void ၿဖစ္သြားပါမယ္။
၂. သင္႔ရဲ႔ဖုန္းကို root လုပ္ဖို႔အတြက္ ဘာေၾကာင္႔သင္႔ရဲ႔ဖုန္းကို root လုပ္ခ်င္တာလဲစတဲ႔
သင္႔ကိုယ္တိုင္ယုံၾကည္စိတ္ခ်မူရွိဖို႔လိုပါပါတယ္။
၃. သင္႔ရဲ႔ဖုန္းကို root လုပ္ဖို႔အတြက္ ေသခ်ာတဲ႔ သင္႔ဖုန္းနဲ႔ ပတ္သက္တဲ႔ root လုပ္နည္း
guide ရွိဖို႔လိုပါတယ္။
သင္႔ဖုန္း ေမာ္ဒယ္အမ်ိဳးအစားၾကည္႔ဖို႔အတြက္ အလြယ္တကူၾကည္႔နည္းက ဖုန္းရဲ႔
အေပၚယံကာဘာ (သို႔မဟုတ္) အမ်ားအားၿဖင္႔ ဘတ္ထၳရီေအာက္မွာ ရွိပါတယ္။
၄. root လုပ္တဲ႔အခါ ေသခ်ာဂရုစိုက္ၿပီး ၊ အဆင္႔ေတြကို ၂ခါၿပန္စစ္ေပးပါ။
၅. root မလုပ္ မိမိဖုန္းထဲမွာရွိတဲ႔ အေရးၾကီးတဲ႔ datas ေတြကို backup လုပ္ထားေပးပါ။
Android ကို root လုပ္လို႔ရလာမဲ႔ အက်ိဳးေက်းဇူးမ်ား
1. Total control over system
root လုပ္ၿပီးတဲ႔ ဖုန္းတစ္လုံးက သင္႔ကို administrator အဆင္႔အေနအထားနဲ႔သင္႔ကိုေပးႏိူင္ပါတယ္။
root လုပ္ထားတဲ႔ ဖုန္းကို ၀င္ေရာက္ၿပီးေတာ႔ system file ေလ႔လာႏူိင္သလို၊ system file ေတြကို
တဖန္ၿပန္လည္ၿပီး modify ၿပဳလုပ္ေပးႏိူင္ပါတယ္။
( ဥပမာ : Android phone / tablet ကို root လုပ္ၿပီး
system file ကို modify ၿပဳလုပ္ၿပီး ၿမန္မာေဖာင္႔ထည္႔ၿပီးအသုံးၿပဳႏိူင္ပါတယ္ )
2. Remove Unwanted apps
ကြ်န္ေတာ္တို႔ ဖုန္းေတြမွာ Original ပါလာတဲ႔ applications ရွိပါတယ္။
တခ်ိဳ႔ apps ေတြက အရမ္းေရးၾကီးတဲ႔အပိုင္းေတြမွာပါသလို တခ်ိဳ႕က ကြ်န္ေတာ္တို႔ရဲ႔
phone memory ကိုအလဟႆၿဖစ္ေစပါတယ္။
ဒါေၾကာင္႔ သင္႔ phone ကို root လုပ္ၿပီးတဲ႔အခါ သင္႔မၾကိဳက္ႏွစ္သက္တဲ႔
applications ေတြကို ၿပန္ၿပီး ၿဖဳတ္ပစ္ႏိူင္ပါတယ္။
3. Change Themes
ကြ်န္ေတာ္တို႔ ဖုန္းက ေန႔စဥ္အသုံးၿပဳကိုင္ေနရတာပါ။
ေန႔စဥ္ ၾကည္႔ေနရၿပီး စတိုင္ အေနအထားေတြက ရုိးအီေနပါၿပီ။
ကြ်န္ေတာ္တို႔ ပုံစံအသစ္ ၊ စတိုင္အသစ္နဲ႔ ေၿပာင္းလဲဖို႔က တခ်ိဳ႕ဖုန္းေတြက
ၿပသာနာ အနည္းငယ္ရွိပါတယ္။ ဒါေပမဲ႔ root လုပ္ၿပီးတဲ႔အခါ သင္႔စိတ္ၾကိဳက္ themes နဲ႔
သင္႔ဖုန္းစတိုင္ေၿပာင္းလို႔ရပါတယ္။
4. Backup Whole System
Android မွာ root လုပ္ၿပီးလို႔ မိမိ total system ကို backup လုပ္ၿပီး SD Card မွာ
သိမ္းထားလို႔ပါတယ္။ အလြယ္ေၿပာရင္ သင္ရဲ႔ iimage ကို hard disk မွာ သိမ္းတာပါ။
အထူးသၿဖင္႔ new ROM ကိုအစမ္းသုံးၾကည္႔ဖို႔အတြက္ system အားလုံးကို သင္႔ backup လုပ္ထားၿပီး
SD Card မွာ သိမ္းထားလို႔ရပါတယ္။ new ROM ကိုအစမ္းသုံးၾကည္႔လုိက္ပါ။ ၾကိဳက္ႏွစ္သက္လား … ?
OK.. မၾကိဳက္ႏွစ္သက္ေတာ႔ဘူးဆိုရင္ သင္႔ရဲ႕ Old System ကိုၿပန္ၿပီးအသုံးၿပဳလို႔ရပါတယ္။
သင္႔ SD Card ထဲမွာ backup လုပ္ၿပီး သိမ္းထားတဲ႔ ” image ” ရွိလို႔ပါ။
သင္႔ရဲ႔ မူရင္း old system ကို ၿပန္ၿပီး အသုံးၿပဳလို႔ရပါတယ္။
5. Installing Special Applications
Android Phone ကို root လုပ္ၿပီးတဲ႔အခါ အရမ္းအသုံး၀င္ၿပီး သင္ၾကိဳက္ႏွစ္သက္တဲ႔ applications
ေတြကို သင္႔ install ၿပဳလုပ္ႏိူင္ပါတယ္။
( ဥပမာ : fullversion အသုံးၿပဳလို႔ရတဲ႔ crack application ေတြကိုဆိုလိုတာပါ )
အရမ္း လြယ္ကူၿပီး ၊ free ရတဲ႔ applications ေတြကို သင္႔ရွာႏိူင္ပါတယ္။
6. Install New ROM , Interference
သင္႔ဖုန္းမွာ Original ပါလာတဲ႔ ROM ကိုသုံးလို႔အားရတဲ႔အခါ (သို႔)
အၿခား New Rom အသစ္သုံးခ်င္တယ္ဆိုရင္လဲ သင္႔ရဲ႕ Android device ကို
ခ်ိန္းၿပီးသုံးႏိူင္ပါတယ္။ ဘာေၾကာင္႔လဲဆိုေတာ႔ အခုဆိုရင္ သင္႔ Android device နဲ႔
ပတ္သက္တဲ႔ ROM ေတြက Online မွာ အလြယ္တကူရွာေဖြႏိူင္ပါတယ္။
အခုဆိုရင္ Android developers ေတြအမ်ားအၿပားရွိပါတယ္။
ကဲ ..ဒီေလာက္ဆိုရင္ Android မွာ root လုပ္ရတဲ႔အေၾကာင္းအရင္း
အနည္းအက်ဥ္းသေဘာေပါက္ေလာက္ပါၿပီ။
အားလုံးအဆင္ေၿပၾကလိမ္႔မယ္လို႔ထင္ပါတယ္။
' Root ဘာေၾကာင့္ လုပ္ရသလဲ"
ဒီစာေလးက Root ဆိုတာ ဘာလဲလို႕ မသိေသးေသာသူေတြအတြက္သာရည္ရြယ္ၿပီး Root ကို ဘာေၾကာင့္လုပ္သင့္သလဲဆိုတာကို
အၾကမ္းၿဖင္းရွင္းၿပေပးတာၿဖစ္ပါတယ္။
Android OS ဆိုတာ opensource (free version) ဆိုေပမဲ႕ mobile ထုပ္လုပ္သူေတြက Stay Version အေနနဲ႕သာထုပ္လုပ္ၾကပါတယ္
။ဒါေၾကာင့္မို႕ မိမိတို႕ Divice ကို root လုပ္ရၿခင္းဆိုတဲ႕ အေၾကာင္းေလးေပၚလာပါတယ္။အခ်ိဳ႕ေသာ program & application ေတြကို
ထည့္သြင္းအသံုးၿပဳခ်င္တဲ႕ အခါမွာ မိမိ Divice က Stay Version ၿဖစ္ေနတဲ႕အတြက္ အသံုးၿပဳခြင့္မေပးပါဘူး။မိမိကို မိမိ Divice ရဲ႕
(user) အသံုးၿပဳသူအေနနဲ႕ ပဲ အသိအမွတ္ၿပဳထားတာပါ။ထိန္းသိမ္းၿပဳၿပင္ခြင့္ရွိသူ (Adminstrator) အၿဖစ္ ခြင့္မၿပဳထားပါဘူး။
အဲဒီအခါမွာ မိမိက မိမိ Divice ကိုမိမိစိတ္ၾကိဳက္ၿပဳၿပင္ဖန္တီးတည္ေဆာက္ခ်င္တယ္ဆုိရင္ သာမန္ user အၿဖစ္က ေန super user
အၿဖစ္ကို ရယူရပါတယ္။
မိမိက မိမိDivice ရဲ႕ Administrator Permissions ၿဖစ္ပီဆိုရင္ေတာ့ မိမိ Divice ကိုမိမိစိတ္ၾကိဳက္ လုပ္ေဆာင္ခို္င္းေစႏိုင္ေလာက္ေအာင္ထိကို
စြမ္းအားေတြရရွိမွာပါ။မိမိသာ programming ကို တက္သိကြ်မ္းက်င္ထားသူၿဖစ္ပါက OS တစ္ခုလံုးကို ေကာင္းေကာင္းေလ့လာခြင့္ရရွိႏိုင္သလို
System တစ္ခုလံုးကိုလဲ မိမိစိတ္ၾကိဳက္ထိန္းခ်ဳပ္ႏုိင္တဲ႕အေနအထားကို ရရွိမွာပါ။
Divice ေတြ ထဲမွာ ပါ၀င္တဲ႕ ROM ကို သာ modified (ၿပဳၿပင္ေဆာင္ရြက္) ႏိုင္တဲ႔ အဆင့္မွာ ရွိေနရင္ မိမိ Divice ကို ကိုယ္ပိုင္
Setting ႏွင့္ ကိုယ္ပိုင္ Themes ေတြကို မိမိစိတ္ၾကိဳက္ၿပဳၿပင္တည္ေဆာက္ႏိုင္မွာပါ။
အႏၱရယ္ရွိတာကေတာ့ System အတြင္းပိုင္းကို နားမလည္ပဲ သြားေရာက္ၿပင္ဆင္မိသြားရင္ေတာ့ မိမိ Divice ေလးကို ဆံုးရံဳးသြားရႏိုင္ပါတယ္။
သို႕မဟုတ္ Firmware အသစ္ ၿပန္တင္ၿခင္းတုိ႕ လုပ္ေဆာင္ရမွာပါ။ထို႕ေၾကာင့္ မိမိက Super User ေကာင္းတစ္ေယာက္ၿဖစ္ခ်င္ရင္ေတာ့
သာမန္ထက္ ပိုမိုထိန္းေက်ာင္း ႏိုင္ေအာင္ေလ့လာမွတ္သားထားဖို႕ေတာ့ လိုပါတယ္။
Root လုပ္ၿပီးလို႕ Super User ဆိုတဲ႔ ပံုေလး မိမိ Divice မွာ ေတြ႔ေနရပီဆိုရင္ေတာ့ Java Language ကိုတက္ကြ်မ္းသူဆိုရင္
Core Level ဆိုတဲ႕ OS Management အဆင့္ထိ၀င္ေရာက္ၿပင္ဆင္ေရးသားႏိုင္မွာပါ။တကယ္လို႕ မိမိက သာမန္ user
တစ္ေယာက္ဆိုရင္ေတာ့ မိမိကိုယ္တိုင္ ၿမန္မာေဖာင့္ ထည့္ၿခင္း၊ၿမန္မာလက္ကြက္ထည့္ၿခင္း၊Root only Application ေတြကို
ထည့္သြင္း အသံုးၿပဳႏိုင္ၿခင္း၊System ကို Backup လုပ္ႏိုင္ၿခင္း၊စေသာစေသာ အက်ိဳးၿပဳတဲ႕ ေသးငယ္ေသာ ထိန္းေက်ာင္း မွဳ႕
ေတြေတာ့ ၿပဳလုပ္ႏိုင္မွာ ၿဖစ္ပါတယ္။ေသခ်ာတာကေတာ့ မိမိ Divice ကို root လုပ္လုိက္ပီဆိုရင္ေတာ့ မူရင္းထုတ္ကုန္ကို
ဆန္က်င္ရာေ၇ာက္တာေၾကာင့္ Warranty ပ်က္သြားႏိုင္တယ္လို႕ဆိုပါတယ္။ဒါေပမဲ႕ သင့္ အေနနဲ႕ Warranty ကို ဂရုစိုက္ေနမွာလား
မိမိ Divice ကို မိမိထိန္းေက်ာင္းႏိုင္ေသာ Super User တစ္ေယာက္အၿဖစ္ခံယူမွာလားဆိုတာကေတာ့ သင္ကိုယ္တိုင္ေရြးခ်ယ္ရမွာပါ..။

ျမန္မာႏိုင္ငံသားေတြ အားလံုးႏွင့္ ထား၀ယ္ေတြ အတြက္ computer အေၾကာင္းေတြပိုမိုသိေစရန္ရည္ ဒီ DAWEI IT(ထား၀ယ္ အိုင္တီ) ဆိုက္ကို ျပဳလုပ္ျခင္းျဖစ္ပါသည္
Wednesday, 19 February 2014
facebook တြင္ဘေလာ့ထားေသာသူကိုunblock ျပန္လုပ္နည္း(မသိေသးသူမ်ားအတြက္သာ)
facebook တြင္ဘေလာ့ထားေသာသူကိုunblock ျပန္လုပ္နည္း
(1) setting ကို၀င္
(2) blocking ကို၀င္
(3) မိမိ block မလုပ္ခ်င္ေတာ့တဲ့သူနာမည္ နေဘးမွာ unblock ေလးကို ျပန္ႏွိပ္ ရံုေလးပါ
ပံုကိုၾကည့္ႏိုင္ပါတယ.္...


(1) setting ကို၀င္
(2) blocking ကို၀င္
(3) မိမိ block မလုပ္ခ်င္ေတာ့တဲ့သူနာမည္ နေဘးမွာ unblock ေလးကို ျပန္ႏွိပ္ ရံုေလးပါ
ပံုကိုၾကည့္ႏိုင္ပါတယ.္...
facebook profile ကို စိတ္ၾကိဳက္ျပင္ရန္
မိမိ facebook ကို စိတ္ၾကိဳက္ျပင္ႏိုင္ရန္ဒီလိုလုပ္ပါ
(1) setting ကို၀င္
(2) privacy ကို၀င္
ျပီးရင္ စိ္တ္ၾကိဳက္ျပင္ေပေတာ့
ပံုေတြၾကည့္ေနာ္


(1) setting ကို၀င္
(2) privacy ကို၀င္
ျပီးရင္ စိ္တ္ၾကိဳက္ျပင္ေပေတာ့
ပံုေတြၾကည့္ေနာ္
Saturday, 15 February 2014
Vroot ျမန္မာေဆာ့၀ဲ Android ဖုန္းနဲ ့ Tablet ေတြကို Root လုပ္နည္း
.jpg)
Android ဖုန္းေတြကို Root ခ်င္ရင္ ဒီေဆာ့၀ဲသံုးပါ ျမန္မာလိုျမင္ရတာမလို ့မခက္ပါ
ကြန္ပ်ဳတာမွာ ဒီေဆာ့၀ဲေလးထည့္ထား Root လုပ္ခ်င္ အလြယ္သံုးလို ့ေကာင္း၏
ျမန္မာစာထည့္ဖို ့အဆင္ေျပဖို ့ Root လုပ္မယ္ဆိုရင္ ဒီေဆာ့၀ဲက အဆင္ေျပတယ္
အသံုးလိုသူမ်ား ေအာက္ကလင့္မွာ Download ယူပါ ျမန္မာလိုေဆာ့၀ဲျဖစ္ပါတယ္
ေဒါင္းလုပ္ဖိုင္ထဲမွာ ၃ခုပါပါတယ္ ပထမဆံုး Vroot ေဆာ့၀ဲကို အင္စေတာလုပ္ပါ
ဒုတိယ Vroot Myanmar ေဖာင့္ကို အင္စေတာလုပ္ပါ တတိယအဆင့္ Rooter
လို ့အမည္ေပးထားတဲ့ Rar ဖိုင္ကို ေကာ္ပီယူပါ။Dasktop က VRoot Iconကို
Right ေထာက္လိုက္ျပီးရင္ Properties ႏွိပ္ပါ Open File Location ကိုသြားပါ
Rooter ဆိုတဲ့မူလဖိုင္ေလးကိုဖ်က္လိုက္ပါ။ ပီးရင္ ေဒါင္းလုပ္ယူထားတဲ့ထဲက
Rooter ဖိုင္ေလးကို ေကာ္ပီကူးထည့္လိုက္ရင္ ျမန္မာလို ့ျမင္ရပါလိမ့္မယ္။
Download - Vroot by Myanmar Language
Friday, 14 February 2014
ထိုင္း SimCrad မ်ား အတြက္အသံုး၀င္ နာမ္ပါတ္ မ်ား
DTAC Happy
Adding *9 returns English language. So *101# would give a Thai message. *101*9# would be in English.
Check your remaining balance – Press: *101*9# send or *101# send
Check your GPRS/EDGE/3G credit – Press: *101*4*9# send
Check your SMS credit – Press: *101*2*9# send
Find out your phone number – Press: *102*9# send
Check your Promotion – Press: *103*9# send – Switch plans IVR: Press *1003 send
Current and last month’s usage – Press *108*9# send
Emergency refill service – Press *110*9# send
Wrong number Refund service – Keypress:*111*9# send – IVR:*1011
Emergency Call Me Back – Press: *114*10_digits_number_you_want_contact*9# send – IVR:*1490
Turn on IR (International Roaming):Press: *118*9#send or *1018 send
Check the price of a call to any country – Press: 004 international_number_to_call send
Send money from PostPaid to a prepaid Happy phone – IVR: *1411Press : *141*happy_number*amount# send Amounts: 20, 50, 100, 200, 300, 400, 500
Live Thai to English translation service: IVR: *1021 send
Check remaining balance of your internet package – *101*4*9# send
AIS 12Call
*120 KeyPress:*120*_Top-up-code_# send – Add Credit – IVR
*139*3# send – Check your remaining data plan balance
*121 send or Press: *121#send – Check your remaining balance
*121*1# send – Check your bonus balance.
*125 or Press *125*1# send – Turn on International Roaming
*545# send – Get your own phone number
*139# send – Check remaining SMS/GPRS/WiFi balance
*777 send – Change Promotion
*700 send – Balance and validity transfer, language change and call me back service
*120 send Call: 900120 send – Activate new SIM
*292* 12call number *amount # send (20,50,100,200,300,500)–Transfer credit from Post Paid to 12Call
*140 send or *140*1* 12call number*amount# send (10,20,50,100)–Transfer credit to another user
*500*9# send – Add 30 days validity for 30 THB on Mao Mao package
AIS 1-2-Call International Calling with 005 and 00500 (cheaper)
Dial 005 or 00500 before the number to use these rates from AIN Globelines service. Example: AUSTRALIA Dial 00500 > 61 14 XXXXXXX = 7 Baht / Min. All keypress codes free.
Check “00500″ call rate to another country – Press *005*0*country code#send
Check “500″ call rate to another country – Press: *500*1*country code#send
Return address and phone number of the countries embassy – Press: *500*2*country code#send
Check the cost of your most recent 005 international call – Press: *500*3#send
Check current time in countries time zone – Press: *500*3*country code#send
True Move Keypress Codes
Refill your credit – Press: *123*top up number#send
Balance check – Press: #123#send
Show your number – Press: *833#send or 99send
Extend Validity – Call: *9344send (3 baht per call)
Check promotion – Press: *835#send
Switch Promotion – Call: 9305send
Change Language – Call: 9304send
TrueMove Care – Call: 1331send (3 baht per call) or +66-8-9100-1331
Activate new SIM card: 9302sendor #110#send
Low cost call: 00600+Country Code+Area Code+Destination Numbersend
First call: 006+Country Code+Area Code+Destination Numbersend
Get free wifi: Text “wifi” to 9433 send (username and pass will be sent via sms)
Buy WiFi for one day: Text “1day” to 9434send
Sign up of WiFi / EDGE / GPRS / 3G: *9000send
Change Language: 9304send
Activate GPRS: 9779send
Gmail 2 step အေကာင့္ ကို ဖုန္း Playstore တြင္ ၀င္နည္း
Gmail 2 step အေကာင့္ ကို ဖုန္း Playstore တြင္ ၀င္နည္း
ပံု တပံု ခ်င္းစီ ေသခ်ာၾကည့္လုပ္ပါ ခင္ဗ်ား အဆင္မေျပတာ ရွိရင္
က်ေနာ္ ကို ေမးႏိုင္ပါတယ္


 အဆင္ေျပပါေစ DAWEI IT(ထား၀ယ္ အိုင္တီ)
ပံု တပံု ခ်င္းစီ ေသခ်ာၾကည့္လုပ္ပါ ခင္ဗ်ား အဆင္မေျပတာ ရွိရင္
က်ေနာ္ ကို ေမးႏိုင္ပါတယ္
Thursday, 13 February 2014
Samsung Secret Codes မ်ား
Samsung Secret Codes
IMEI number: *#06#
Serial number: *#0001#
Battery status- Memory capacity : *#9998*246#
Debug screen: *#9998*324# - *#8999*324#
LCD kontrast: *#9998*523#
Vibration test: *#9998*842# - *#8999*842#
Alarm beeper - Ringtone test : *#9998*289# - *#8999*289#
Smiley: *#9125#
Software version: *#0837#
Display contrast: *#0523# - *#8999*523#
Battery info: *#0228# or *#8999*228#
Display storage capacity: *#8999*636#
Display SIM card information: *#8999*778#
Show date and alarm clock: *#8999*782#
The display during warning: *#8999*786#
Samsung hardware version: *#8999*837#
Show network information: *#8999*638#
Display received channel number and received intensity: *#8999*9266#
*#1111# S/W Version
*#1234# Firmware Version
*#2222# H/W Version
*#8999*8376263# All Versions Together
*#8999*8378# Test Menu
*#4777*8665# GPSR Tool
*#8999*523# LCD Brightness
*#8999*377# Error LOG Menu
*#8999*327# EEP Menu
*#8999*667# Debug Mode
*#92782# PhoneModel (Wap)
#*5737425# JAVA Mode
*#2255# Call List
*#232337# Bluetooth MAC Adress
*#5282837# Java Version
Type in *#0000# on a Samsung A300 to reset the language
Master reset(unlock) #*7337# (for the new samsungs E700 x600 but not E710)
Samsung E700 type *#2255# to show secret call log (not tested)
Samsung A300, A800 phone unlock enter this *2767*637#
Samsung V200, S100, S300 phone unlock : *2767*782257378#
Samsung Secret Codes Part 2
#*7785# Reset wakeup & RTK timer cariables/variables
#*7200# Tone Generator Mute
#*3888# BLUETOOTH Test mode
#*7828# Task screen
#*#8377466# S/W Version & H/W Version
#*2562# Restarts Phone
#*2565# No Blocking? General Defense.
#*3353# General Defense, Code Erased.
#*3837# Phone Hangs on White screen.
#*3849# Restarts Phone
#*7337# Restarts Phone (Resets Wap Settings)
#*2886# AutoAnswer ON/OFF
#*7288# GPRS Detached/Attached
#*7287# GPRS Attached
#*7666# White Screen
#*7693# Sleep Deactivate/Activate
#*2286# Databattery
#*2527# GPRS switching set to (Class 4, 8, 9, 10)
#*2679# Copycat feature Activa/Deactivate
#*3940# External looptest 9600 bps
#*4263# Handsfree mode Activate/Deactivate
#*2558# Time ON
#*3941# External looptest 115200 bps
#*5176# L1 Sleep
#*7462# SIM Phase
#*7983# Voltage/Freq
#*7986# Voltage
#*8466# Old Time
#*2255# Call Failed
#*5376# DELETE ALL SMS!!!!
#*6837# Official Software Version: (0003000016000702)
#*2337# Permanent Registration Beep
#*2474# Charging Duration
#*2834# Audio Path (Handsfree)
#*3270# DCS Support Activate/Deactivate
#*3282# Data Activate/Deactivate
#*3476# EGSM Activate/Deactivate
#*3676# FORMAT FLASH VOLUME!!!
#*4760# GSM Activate/Deactivate
#*4864# White Screen
#*7326# Accessory
#*7683# Sleep variable
#*3797# Blinks 3D030300 in RED
#*7372# Resetting the time to DPB variables
#*3273# EGPRS multislot (Class 4, 8, 9, 10)
#*7722# RLC bitmap compression Activate/Deactivate
#*2351# Blinks 1347E201 in RED
#*2775# Switch to 2 inner speaker
#*7878# FirstStartup (0=NO, 1=YES)
#*3838# Blinks 3D030300 in RED
#*2077# GPRS Switch
#*2027# GPRS Switch
#*0227# GPRS Switch
#*0277# GPRS Switch
#*22671# AMR REC START
#*22672# Stop AMR REC (File name: /a/multimedia/sounds/voice list/ENGMODE.amr)
#*22673# Pause REC
#*22674# Resume REC
#*22675# AMR Playback
#*22676# AMR Stop Play
#*22677# Pause Play
#*22678# Resume Play
#*77261# PCM Rec Req
#*77262# Stop PCM Rec
#*77263# PCM Playback
#*77264# PCM Stop Play
#*22679# AMR Get Time
*#8999*364# Watchdog ON/OFF
*#8999*427# WATCHDOG signal route setup
*2767*3855# = Full Reset (Caution every stored data will be deleted.)
*2767*2878# = Custom Reset
*2767*927# = Wap Reset
*2767*226372# = Camera Reset (deletes photos)
*2767*688# Reset Mobile TV
#7263867# = RAM Dump (On or Off)
Samsung Secret Codes Part 3
*2767*44927# = UK WAP Settings
*2767*31927# = Netherlands WAP Settings
*2767*420927# = Czech WAP Settings
*2767*43927# = Austria WAP Settings
*2767*39927# = Italy WAP Settings
*2767*33927# = France WAP Settings
*2767*351927# = Portugal WAP Settings
*2767*34927# = Spain WAP Settings
*2767*46927# = Sweden WAP Settings
*2767*380927# = Ukraine WAP Settings
*2767*7927# = Russia WAP Settings
*2767*30927# = GREECE WAP Settings
*2767*73738927# = WAP Settings Reset
*2767*49667# = Germany MMS Settings
*2767*44667# = UK MMS Settings
*2767*31667# = Netherlands MMS Settings
*2767*420667# = Czech MMS Settings
*2767*43667# = Austria MMS Settings
*2767*39667# = Italy MMS Settings
*2767*33667# = France MMS Settings
*2767*351667# = Portugal MMS Settings
*2767*34667# = Spain MMS Settings
*2767*46667# = Sweden MMS Settings
*2767*380667# = Ukraine MMS Settings
*2767*7667#. = Russia MMS Settings
*2767*30667# = GREECE MMS Settings
*#7465625# = Check the phone lock status
*7465625*638*Code# = Enables Network lock
#7465625*638*Code# = Disables Network lock
*7465625*782*Code# = Enables Subset lock
#7465625*782*Code# = Disables Subset lock
*7465625*77*Code# = Enables SP lock
#7465625*77*Code# = Disables SP lock
*7465625*27*Code# = Enables CP lock
#7465625*27*Code# = Disables CP lock
*7465625*746*Code# = Enables SIM lock
#7465625*746*Code# = Disables SIM lock
*7465625*228# = Activa lock ON
#7465625*228# = Activa lock OFF
*7465625*28638# = Auto Network lock ON
#7465625*28638# = Auto Network lock OFF
*7465625*28782# = Auto subset lock ON
#7465625*28782# = Auto subset lock OFF
*7465625*2877# = Auto SP lock ON
#7465625*2877# = Auto SP lock OFF
*7465625*2827# = Auto CP lock ON
#7465625*2827# = Auto CP lock OFF
*7465625*28746# = Auto SIM lock ON
#7465625*28746# = Auto SIM lock OFF
Type *#9998*627837793# Go to the 'my parameters' and there you will find new menu where you can unlock phone.(not tested-for samsung C100)
To unlock a Samsung turn the phone off take the sim card and type the following code *#pw+15853649247w# .
Java status code: #*53696# (Samsung X600)
If you want to unlock your phone put a sim from another company then type *#9998*3323# it will reset your phone. Push exit and then push 7, it will reset again. Put your other sim in and it will say sim lock, type in 00000000 then it should be unlocked. Type in *0141# then the green call batton and it's unlocked to all networks. This code may not work on the older phones and some of the newer phones. If it doesn't work you will have to reset your phone without a sim in it by typing *#2767*2878# or *#9998*3855# (not tested)
Wednesday, 12 February 2014

Wednesday, 5 February 2014
DOTA 1 ကို RGC ျဖင့္ online ခုတ္နည္း
DOTA 1 ကို RGC ျဖင့္ online ခုတ္နည္း
ေတြ ့ရင္လဲ ေခၚၾကေနာ္ daweiit နာမည္ နဲ ့ ခုတ္ေနတယ္ :P
1 Client ေဒါင္းရပါမည္ ေဒါင္းရန္ ႏွိပ္ပါ
၀င္ ျပီးတာနဲ ့Download Now ကိုႏွိပ္ပါ
2 မိမိ dota က 2.6 ျဖစ္ေနရမည္ ျပီးေတာ့ မိမိ dota မွာ ေနာက္ဆံုးထြက္ ေျမပံု ရွိေန ရမည္
ေနာက္ဆံု ထြက္ ေျမပံု ေတြ ေဒါင္းရန္ Download
3 အေကာင့္ သစ္ ဖြင့္ ေဆာ့ရမည္ :P
4 က်န္တာ ေအာက္မွာ ဆက္ ေလ့လာ ပါ
အဆင္မေျပပါ က daweiit@gmail.com ကိုေမးျမန္းႏိုင္သည္
RGC အေကာင့္ က အေကာင့္သစ္ စဖြင့္တာနဲ ့ မိမိ ကို အမွတ္ 1500 စေပးပါတယ္
အမွတ္ နဲ ့ ဆိုေတာ့ ကိုယ္ ရဲ့ လက္ရည္ ကို သိရတာေပါ့
တပြဲ ႏိုင္ ရင္ 5 မွတ္ တက္ပါတယ္ ရွံုးရင္လဲ ရွံုး သလို အမွတ္ ႏွဳတ္ပါတယ္
- Intruduction
- Download, install and run "RGC"
- Make account and login into client
- Play your first game
- Knowing client better
Hello everyone, this is tutorial about how to use Ranked Gaming Client properly. It contains basic info about the things that you need to be familliar with, in order to play on the client. When you finish reading this tutorial, you might want to check out Client General Commands. and the Client Access Commands.
- Download "Ranked Gaming Client" latest version from here: Click here!
- Extract files from downloaded content. There is no rule where you must extract files. In case below, I extracted files into "Program Files".
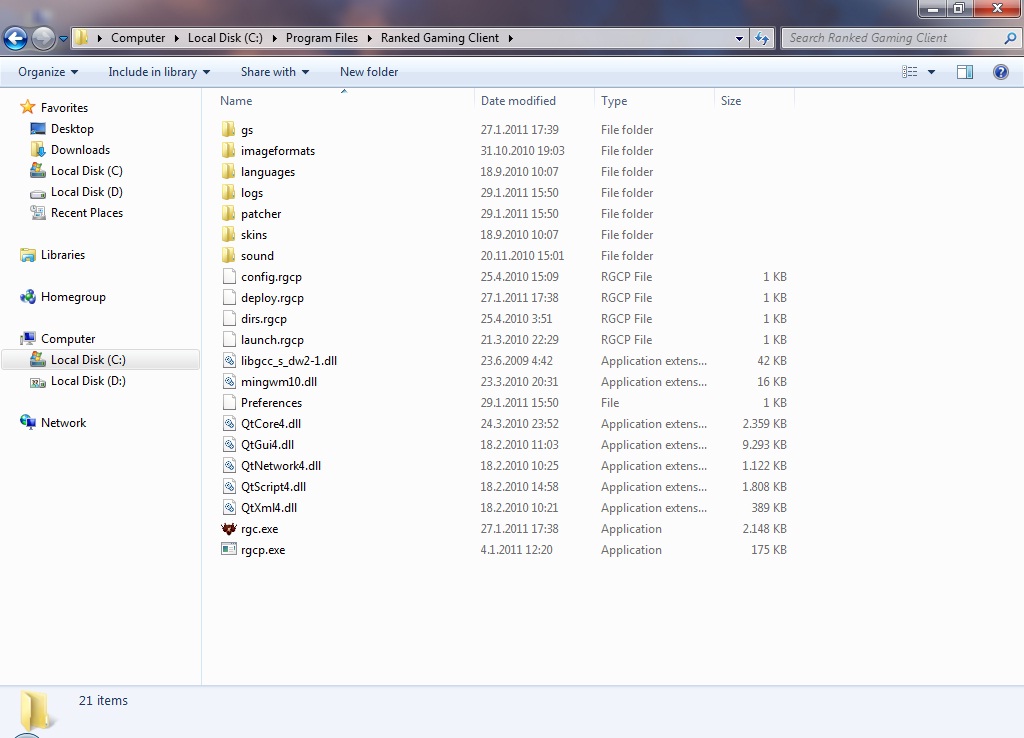 Picture 1. Extracted content
 - Go to extracted "Ranked Gaming Client" folder and run "rgc.exe". If updates are available, patcher will be showed. Update will be automatically downloaded and installed. After that, "Connect" window should pop-up.
Notes:
-If you are using "Windows 7" be sure to run "rgc.exe" as a administrator. If "RGC" fails to update, first run rgcp.exe as a administator.
-If you experience any other problems, bugs, feel free to check our Support Center.
-Your "Connect" window layout could look diffrent because default skin may vary but more about that in upcoming chapters.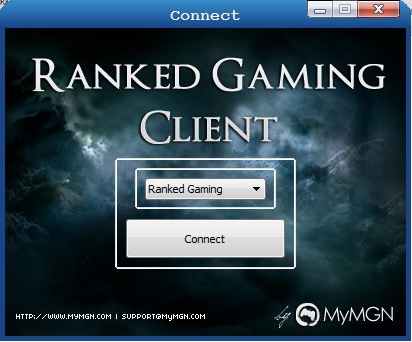 Picture 2. Connect window
- After you click on "Connect" button, "Login" window should pop-up. To make new account click "Register" button.
Notes:
-If you are unable to connect, probably your antivirus is blocking "RGC". So you must put "RGC" on safelist. How to do that
would depend on the antivirus you use.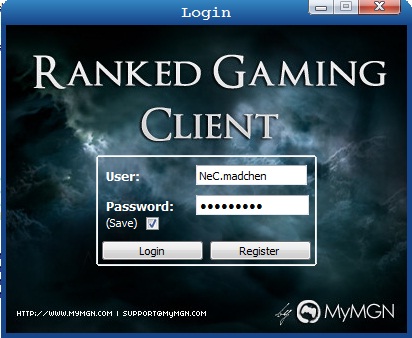 Picture 3. Login window
 - In "Register" window fill all fields with required information and click "Register"
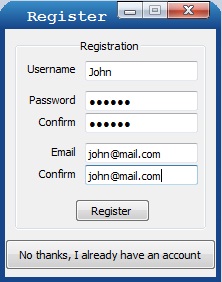 Picture 4. Register window
 - After you finished registration, you will be re-directed back to "Login" window. Enter your user name and password and press "Login" button. If you enter correct information, "RGC" main window should pop-up.
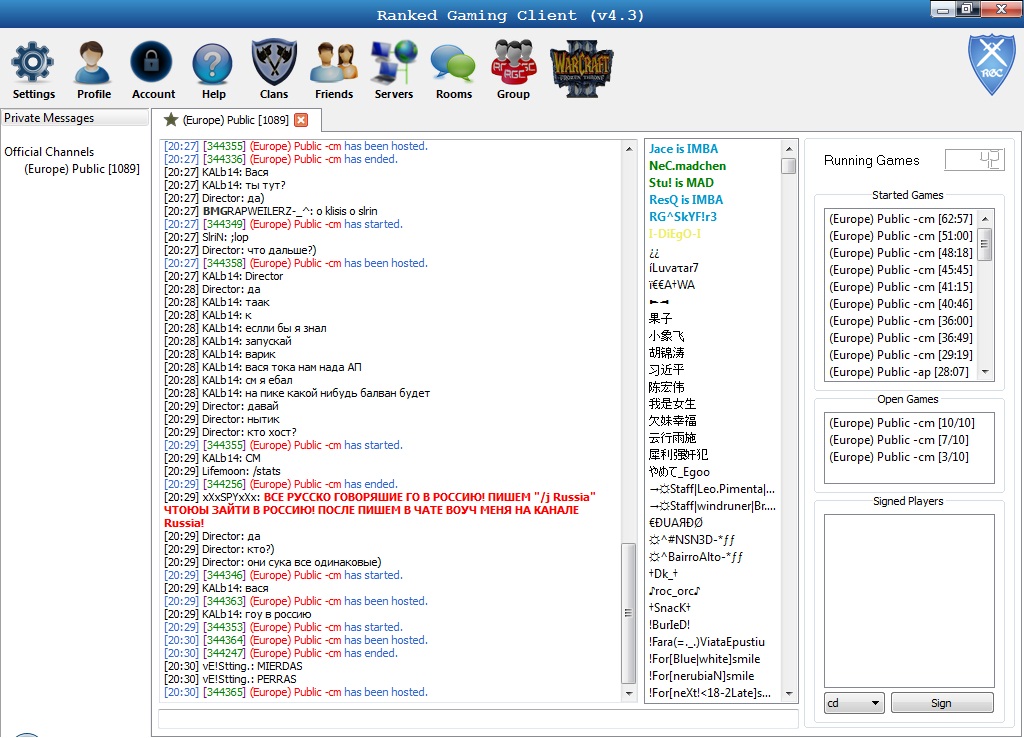 Picture 5. Main window
- First you need to set path to your "Warcraft III:Frozen Throne.exe". To do that click on "Settings" which is located in the upper-left corner of the client. Then click on Dota tab. Click on "Find" and navigate to your "Warcraft III" folder and select "Frozen Throne.exe". In case below i set my path to "D:/Warcraft III/Frozen Throne.exe". Also you can choose default mode. In the end don't forget to save.
Notes:
-Currently "RGC" is supporting "Warcraft III:Frozen Throne" 1.26 version. If you don have it, you won't be able to play.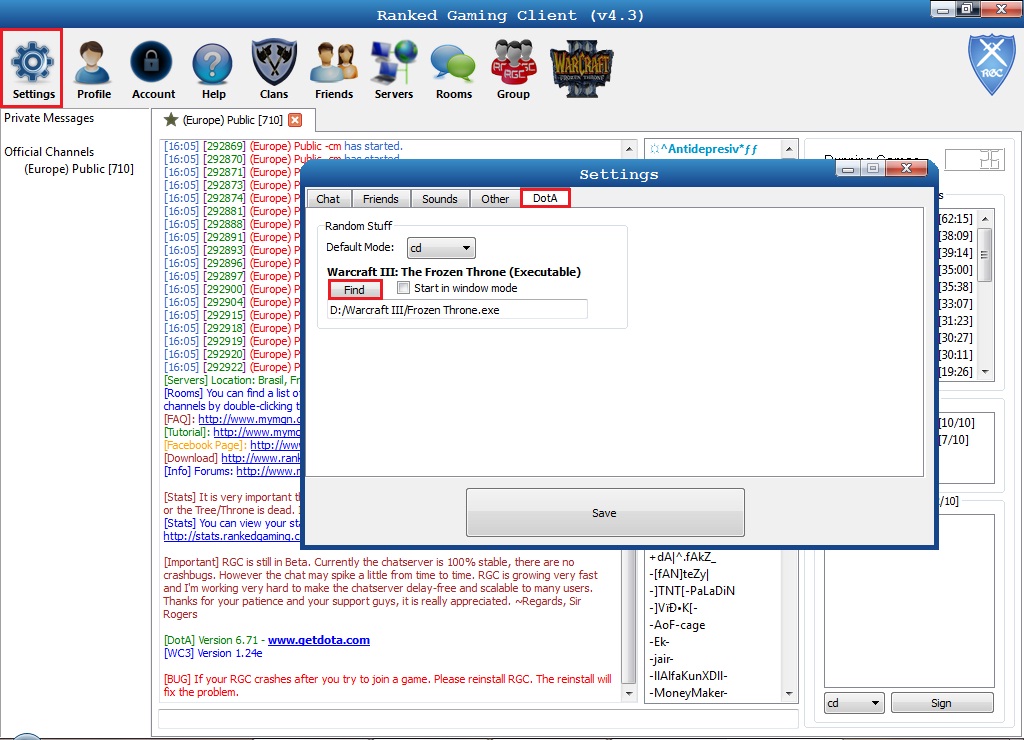 Picutre 6. Setting path
 - Now we are ready to sign for a game. To do that press "Sign" button in the bottom-right corner. Your nick should be added to "Signed players" list. When 10 players are signed you will hear sound "The game has been hosted" and text message on chat too(
 ). Start your "Warcraft III:Frozen Throne" by clicking on last button in a row on the top of the client.
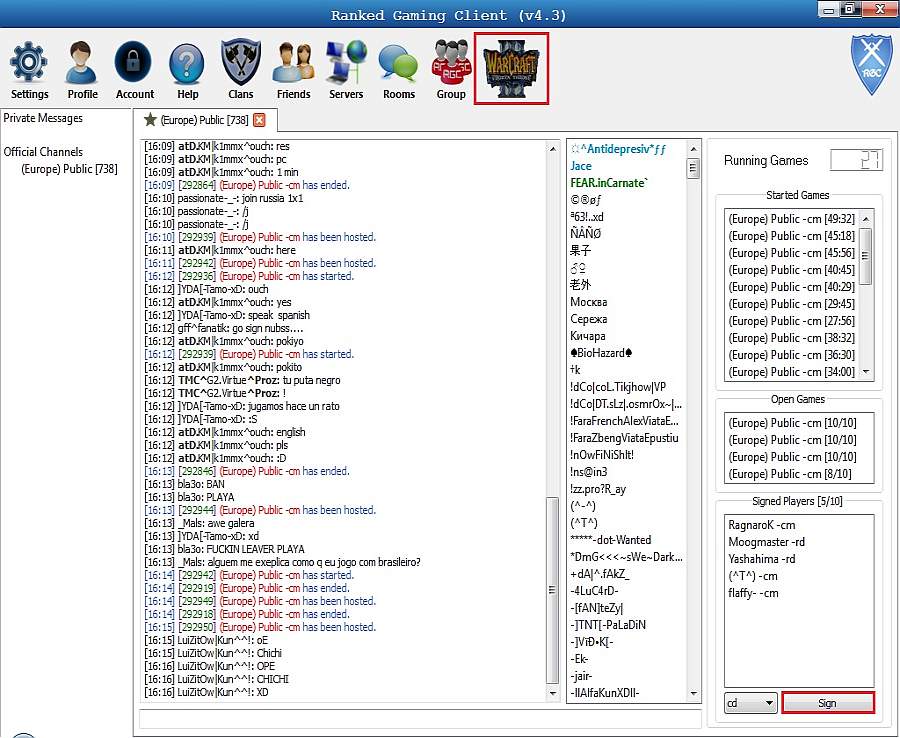 Picutre 7. Sign and run game
 - In "Warcraft III:Frozen Throne" go to "Local Area Network" (
 ) and you will see list of hosted games. The game you signed for would appear blue.
 - Now join a game. Since you are signed for that game, your slot will be reserved for a minute. After a minute, all slot reservation are removed and everyone is able to to enter a hosted game. To make a game start, all players inside game need to type "!ready". As soon as possbile all players type "!ready" bot will start a game and you will hear sound "The game is starting". Also you can check your ping to server by typing "!pingall". Haven fun in your game.
 Picture 9. Typing "!ready"
 - Do not leave game before the Tree/Throne is dead or game is "!ff'd" or remaked. With "!ff" command you can vote for forfeiting game before the Tree/Throne is dead or with "!votermk" command to be remaked. You can check your win/lose ratio here.
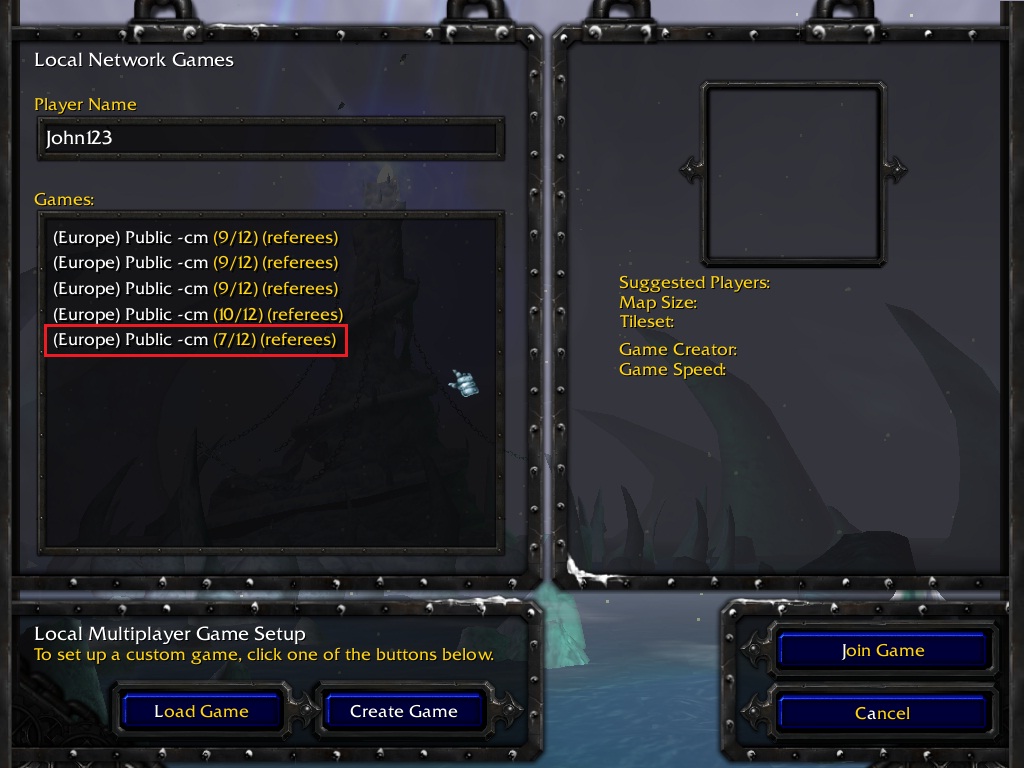
Picture 8. Hosted games list"
- Lets go back to main window. To explain better main window environment and functionality, we will divide it in few parts:
- Menu
- Rooms list and private messages
- Chat window and user list
- Games list and sign system
On the picture below you can see these parts graphically presented.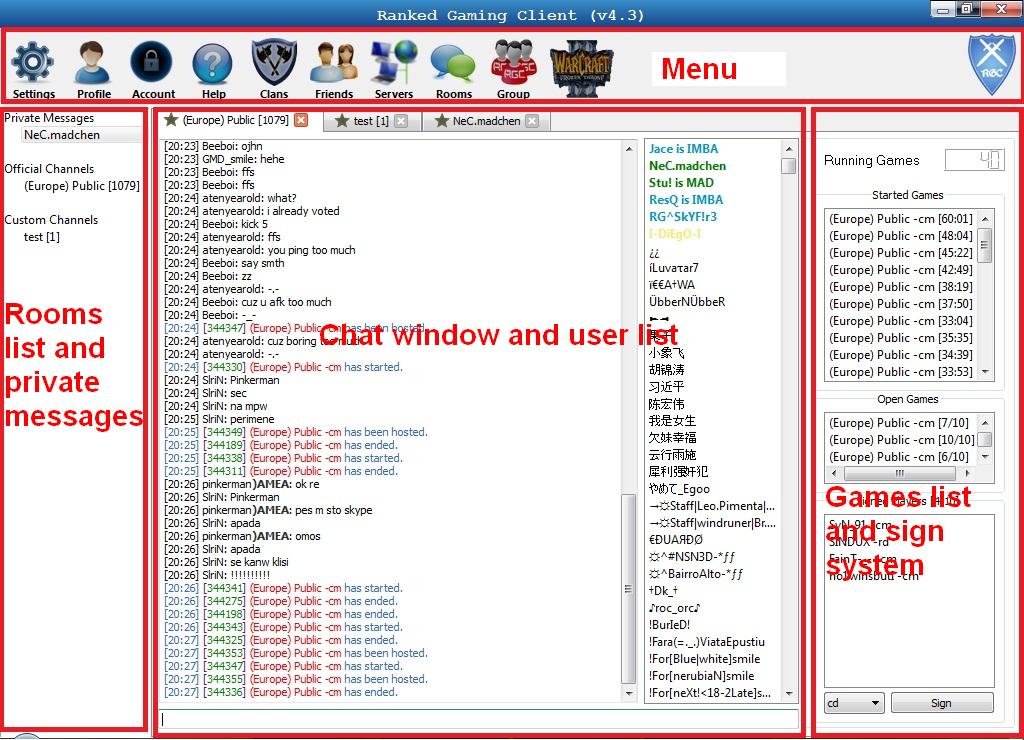 Picture 10. Main window parts
 - Chat window and user list occupy the central part of main window. Use text box on the bottom of the client to send text messages. Also you can use text box for "commands". With "commands" you can add friend, check somones profile, join another channel, whisper a user... To add user in friend list you must type "/f add name" (e.g. /f add Sir-rogers). You can check list of all commands here.
Subscribe to:
Comments (Atom)